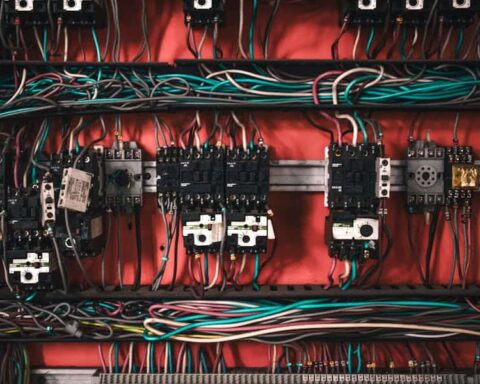
Do you own an RV? Are you worried about keeping it powered and safe? Do you want to cut the cord on your generator so you can spend more time just exploring in your RV instead of worrying about energy costs and time? An RV breaker box lets you connect your generator directly to your home’s power supply. This article will explain how, why, and what type of RV breaker box is best for your needs.
How To Wire Inverter To Rv Breaker Box?
sandály na klínku černé
vagabond tricouri barbati
gucci genser
nike genser
calvin klein ledvinka
rolex de diamantes
kitten heel flip flops black
מבצעים מצעים למיטת תינוק
סרבל לבן טייסים
scott mountainbike
Plan Your Installation
This is so you can actually get work done instead of just researching and wondering. – Take inventory of your RV’s wiring. If you’re not sure where something is, start with a paper trail so you can retrace your steps. A simple diagram of the RV’s wiring diagram (both battery and utility) can come in handy here. – Determine how much power you need. If you’re unsure, you can measure how much power your RV is pulling (it should be labeled somewhere). You can also call your RV’s manufacturer for help. – Determine what you’ll need to install. This might include a breaker box, meter, and cord. If you have an electric hookup at home, you may also need extra wiring. – Install a 240-volt battery charger. The benefits of having this are many, but if you don’t want it, you don’t need it.
Decide Where To Install Your Breaker Box
The first decision to make is where to place your breaker box. There are several options here: – Inside the RV. This is the simplest and most convenient option since it takes up the same space as the breaker and fuse boxes. – Outside the RV. In this case, the breaker box and cord need to go through a small hole in the RV’s exterior. – Somewhere near the power source. This can also be inside the RV or outside. The main thing to keep in mind here is that the breaker box needs to be close enough for the cord to reach it.
Mark Your Breaker Box Location
This is the most important step of the whole installation process. Make sure you mark the exact location of your breaker box on the inside or outside of the RV. It should be right next to the power cord and clear the fuse box or breaker box. If you’re installing inside the RV like we discussed above, you can find the inside location with a paper trail. If not, look at the RV’s electrical diagram and see where the power comes in and goes out. Now you want to make a mark right next to that point. You’ll also want to mark the exact location of your fuse box and breaker if either of them is inside the RV. It’s OK if they aren’t near the breaker box, but you’ll want to mark the exact location.
Install The Breaker Box Fuse Box
Here’s where you’ll install the fuse box inside the RV. Make sure it’s close to your breaker box and you marked it on the RV’s interior. You’ll also need to run a wire from your fuse box to your breaker box. If it’s inside the RV, this is probably buried in some conduit. The easiest way to get it out is to use a conduit snake.
Hook Up The RV Wiring
Now you can start hooking up the wires to your RV. If it’s inside the RV, you’ll probably find it inside a panel or even under the carpet. It’s best to start there. Now that you’re in the panel, you’ll want to start tracing the wires. It’s very helpful to mark their locations with sticky notes so you can retrace your steps easily. You can also use a wiring diagram if you have one.
Connect The Ground Wire
Blow out your breaker box. This is a good time to clean out the box’s interior as well. It’d be a shame to start wiring up the RV and get electrocuted by the clogged dust bunnies inside the box. Now, find the ground wire. It’s usually red and usually goes to a metal plate or grounding wire.
Add New Outlets And Switches
Now it’s time to add new outlets and/or switches. It’s best to do this near your new breaker box and in the same room. It’s also helpful to mark their locations on the wall or on a piece of paper. Add a 20 amp outlet near your new breaker box. This will be your main power source. You may want to consider adding a charging station as well.
Why Install An Rv Breaker Box?
1. Safety:
An RV breaker box will provide a safer environment for wiring and electrical connections. It is designed to protect against overloads and potential fires caused by faulty wiring or other electrical issues.
2. Improved Functionality:
An RV breaker box can provide greater flexibility in how you use your RV’s electrical systems, including providing more outlets and improved power management.
3. Protection from Power Surges:
RV breaker boxes are designed to protect your appliances and other electrical equipment from spikes in voltage that can cause damage to sensitive components.
4. Separate Circuits for Different Areas of Your RV:
With an RV breaker box, you can easily separate the power source going to different areas of your RV. This will help to reduce the risk of overloading circuits and damaging equipment.
5. More Accurate Monitoring:
An RV breaker box will allow you to keep better track of the power usage in your RV, helping you avoid running into problems with overloading circuits or not having enough power for certain tasks.
6. Easier Access to Wiring:
An RV breaker box makes it easier to access the wiring within the walls of your RV, making repairs and maintenance much simpler.
7. Improved Aesthetics:
With an RV breaker box, you can hide all the wiring behind a nice-looking panel, improving the overall look and feel of your RV.
8. Increased Home Value:
Installing an RV breaker box can add value to your home if you ever decide to sell it.
9. Easy Maintenance:
An RV breaker box is designed for easy maintenance and repairs, so you don’t have to worry about costly or complicated repairs in the future.
10. Cost Savings:
Installing an RV breaker box can save you money in the long run due to the improved safety and functionality it provides.
The Advantages Of Installing A Breaker Box
1. Safety:
Having a breaker box installed in your home provides added safety for you and your family. Breakers are designed to trip when too much electricity is flowing through the circuit, reducing the risk of electrical fires or other disasters.
2. Customization:
With a breaker box, you can customize how your electricity flows throughout your home by controlling individual circuits. This means you can easily power certain areas of your home without having to turn off all the lights and appliances in the entire house.
3. Expansion:
A breaker box allows for easy expansion when you need more electricity flowing through your home. Adding a new circuit is simple, as all you need to do is attach it to an existing breaker, and you’re good to go.
4. Cost Savings:
Installing a breaker box can save you money in the long run by preventing electrical overloads, which could cause damage to your appliances or wiring and be costly to repair. It also enables you to easily switch off circuits when not in use, reducing energy consumption and helping you save on utility bills.
5. Peace of Mind:
Knowing that your home is outfitted with a breaker box adds an extra layer of security against electrical hazards, giving you and your family peace of mind.
Disadvantages Of Installing A Breaker Box
1. Cost:
Installing a breaker box can be expensive, depending on the size of your home and the type of installation. Depending on how many circuits you need to accommodate, installing a larger panel may require running additional wiring throughout your house, adding to the cost of the project.
2. Time-Consuming Installation:
Installing a breaker box is not a simple, one-day job. Depending on the complexity of the project, it can take several days or even weeks to properly install a breaker box and all associated wiring.
3. Difficulty:
Installing a breaker box requires knowledge of electrical systems and some DIY experience. You may need to hire an electrician to complete the task if you do not feel comfortable doing it yourself.
4. Difficulty Troubleshooting:
If you have an issue with your breaker box, troubleshooting and finding the cause of the problem can be difficult and time-consuming. In some cases, a professional electrician may need to be called in order to diagnose the issue.
5. Fire Hazard:
Installing a breaker box improperly or using faulty wiring can lead to a fire hazard. It is important that the breaker box and associated wiring be installed correctly in order to avoid this potential danger.
6. Safety:
If you do not feel comfortable working around high-voltage electricity, it is best to hire a professional electrician for the job. Incorrectly installed breaker boxes can result in serious injury or death. It is important to ensure that the breaker box and associated wiring are installed correctly in order to avoid any potential danger.
Final Words
Wiring an inverter to your RV breaker box is a relatively straightforward process. By following the steps laid out here and paying close attention to safety guidelines, you can rest assured that you have taken every precaution. Moreover, even after you have successfully wired your inverter, remember to maintain regular troubleshooting and maintenance checks. For instance, always keep an eye on voltage levels in different parts of your system and check connections for any signs of wear or damage. Finally, by staying vigilant and exercising caution, you will be able to enjoy the convenience of running an inverter on board with confidence!